

- It only appears after the customer’s first in-store visit, and only while the Feedback automatic message is switched on. Someone who signs up online but has never been in does not get asked. If you turn Feedback off, the link does not appear.
- It points at the right store. If you run more than one location, each customer sees the review page for the store they joined at, not a single shared link for the whole business.
The three settings
The review link is set on the card, in the Information step. You set it when you create a card or by editing an existing one. Under Review Link you pick one of three:Automatic (recommended)
Automatic (recommended)
VEXiON uses your Google Business Profile and shows each customer the review page for the store they signed up at. You do not paste anything and you never have to maintain a link.This is the option to pick if you have a Google listing. It is the only one that adapts per customer, and it keeps working on its own when you open a new store.
Custom link
Custom link
You paste one link and every customer sees that same link, wherever they joined.It does not have to be Google. Plenty of businesses point this at their own review page, a feedback form, or another review site. Use this when you want full control over where people land, or when you do not have a Google listing.
Off
Off
No review link appears on the customer’s card at all.
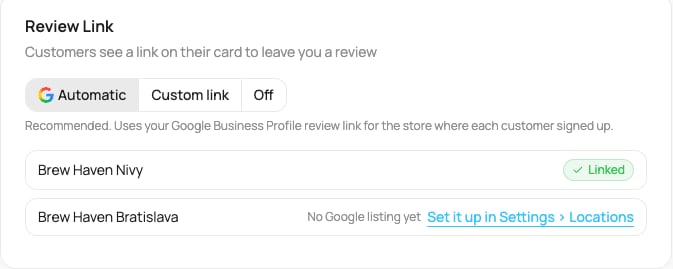
The Review Link control, set to Automatic
Setting up Automatic
When you choose Automatic, the card shows a list of your locations, each with its own status:- Linked: this store has a Google listing connected, and its customers will get its review page.
- No Google listing yet: this store has nothing connected yet, so its customers fall back to whatever the card itself has.
1
Open the card's Information tab
From Passes, open the card, click Edit Card, and go to Information.
2
Choose Automatic
Under Review Link, pick Automatic. Your locations appear underneath with their status.
3
Connect any store that says No Google listing yet
Click Set it up in Settings > Locations next to that store, then follow the steps in the next section.
4
Save
Click Save.
If you have not added any locations yet, you will see “Add a business location before pulling in a Google review link.” Add your store under Locations first, then come back.
Connecting a location to Google
A store gets its review page from its Google listing, which is stored on the location itself, not on the card. You connect it under Settings, Locations:- When you add a location, the first step lets you search for your business on Google and pick it from the list. Choosing it fills in the name, the address, the map pin and the Google listing in one go. This is the easiest route, so use the search rather than “Add manually” whenever your business is findable.
- On a location you already have, open Edit and re-pick your business from the address search. Selecting a result from the dropdown attaches the Google listing.
What the customer sees
On Apple Wallet the link sits on the back of the card (the ”…”), shown as “Rating” with stars. On Google Wallet it is a button on the card. Tapping it opens the review page, where they can rate you in a couple of taps. It appears after their first in-store visit, not when they sign up, and only while the Feedback automatic message is on. So a customer who joins through a QR code at home does not see it until they have actually been in and been scanned.The link is worked out fresh every time the card updates, so it is always current. If you connect a store’s Google listing today, its customers pick up the new link on their next scan. Nothing needs to be re-issued and no one has to re-add their card.
Which store a customer is matched to
With Automatic, VEXiON works down this list and uses the first one it can:- The store where the customer signed up. This is set once, when they join, and it never changes afterwards, so their link stays stable.
- The store where they last had a scan, if they joined without a store attached (for example through an online sign-up).
- Your only store, if you run a single location.
- The card’s own link, if none of the above resolves.
Customers who only ever bought online, for example through your webshop, get no review link until their first in-store visit.