Connecting from the Storyous Marketplace (recommended)
The fastest way. You do not need your Merchant ID and you do not need to contact Storyous support.
1
Activate VEXiON cards in Storyous
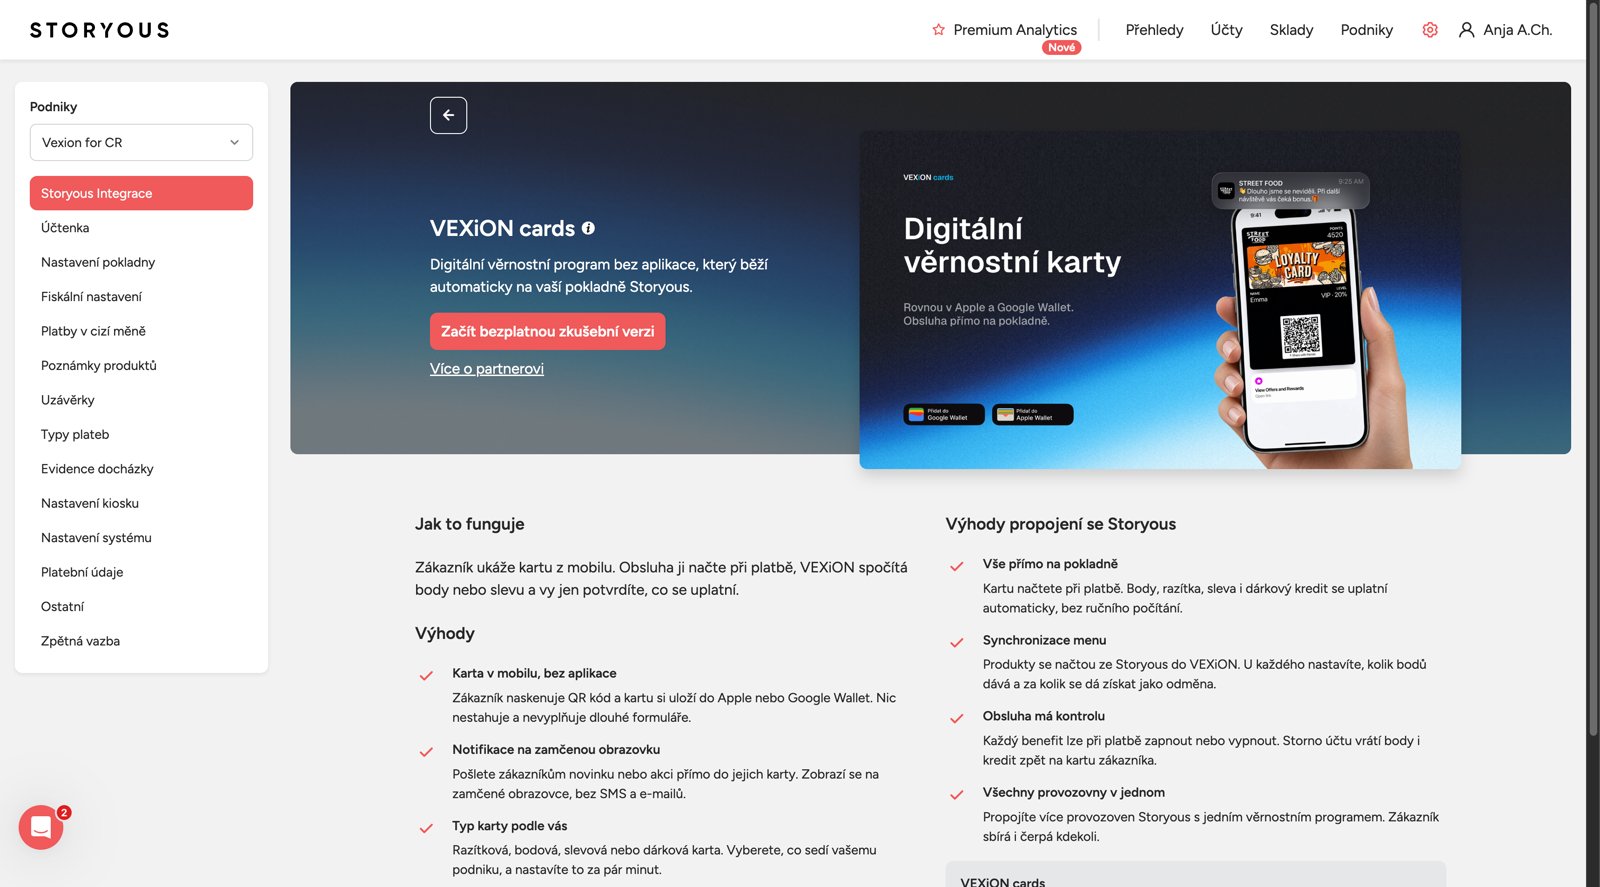
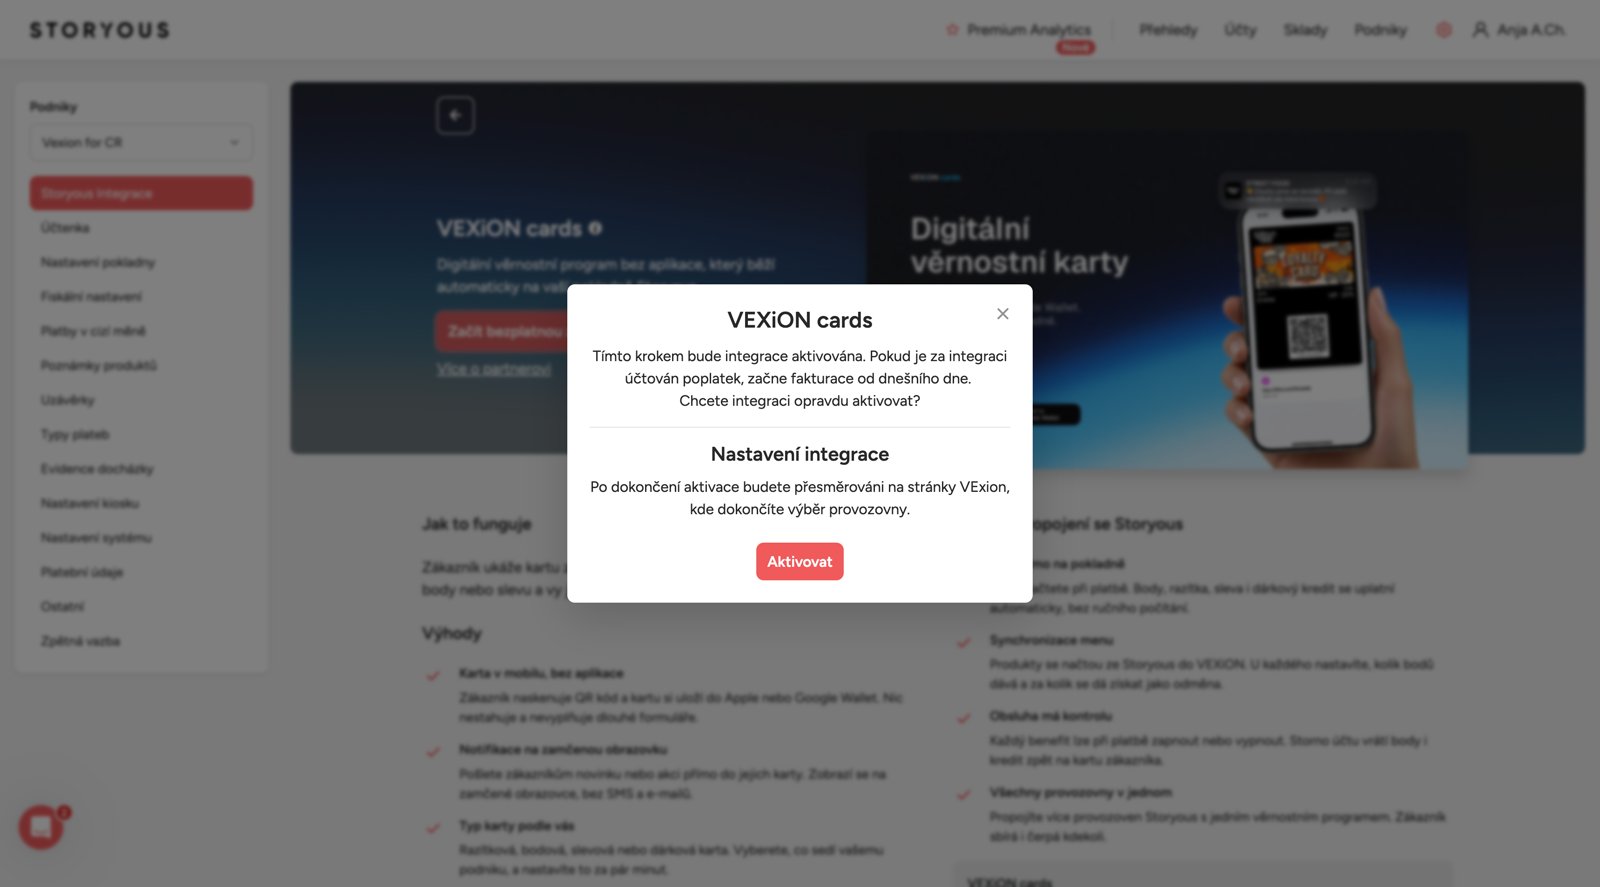
In your Storyous admin, open the settings (gear icon) and choose Storyous Integrace, then open VEXiON cards. Or open VEXiON cards in the Storyous Marketplace directly. Sign in to Storyous first if it asks. If you have several places, choose the place in the Podniky menu on the left.Click the activation button and confirm with Aktivovat.
VEXiON cards in the Storyous Marketplace
Storyous asks you to confirm
2
Continue in VEXiON cards
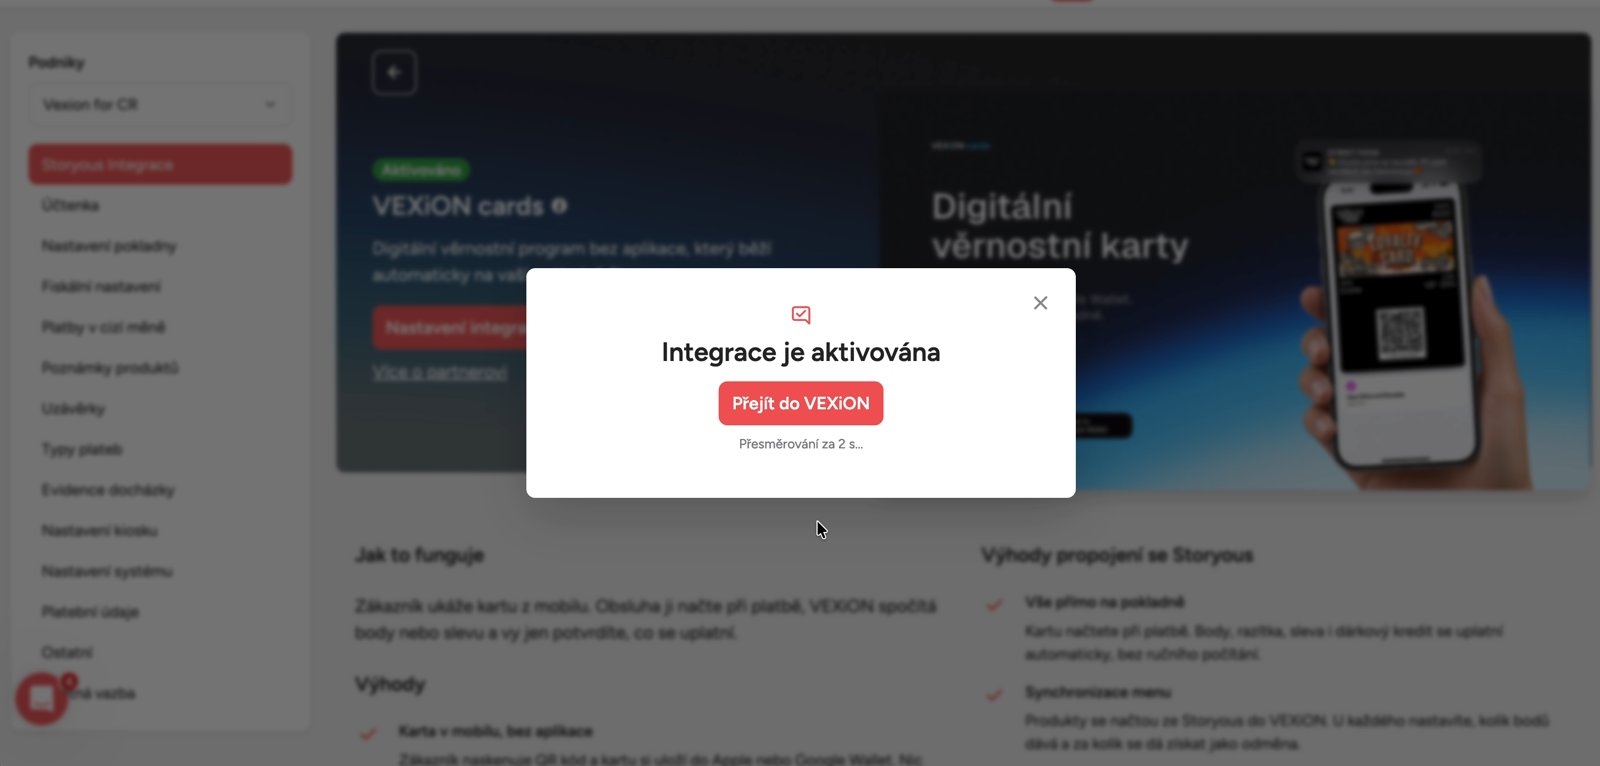
Storyous shows Integrace je aktivována and opens VEXiON cards in a new tab after a few seconds. You can also click Přejít do VEXiON.Already signed in to VEXiON cards? The Storyous panel opens straight away. Not signed in? You see Sign in to finish connecting Storyous. Sign in and VEXiON cards brings you back to the Storyous panel. No account yet? Create one: you choose VEXiON PRO, monthly or annual, and pay by card. If you manage several VEXiON accounts, check that the account at the top left is the one this Storyous merchant belongs to.
Storyous sends you to VEXiON cards
3
Choose and map your places
The Select locations dialog opens with your Storyous merchant already filled in. Switch on your places and map them, as described in Selecting your places and Mapping your locations.
4
Finish the setup
A box shows the next steps: choose your card type, sync your menu and test one card scan at the till. Back to Storyous returns you to the Storyous tab.
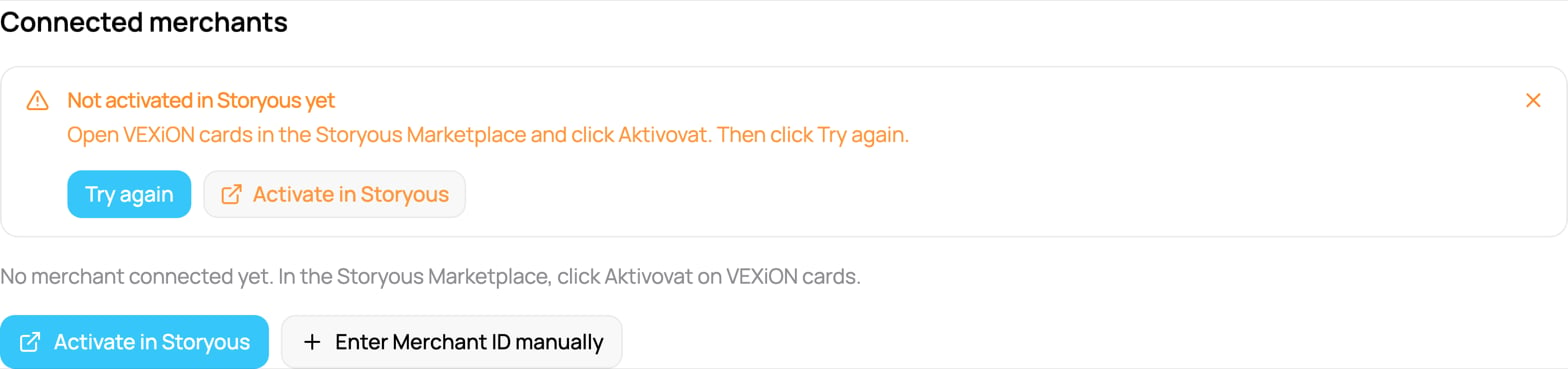
Started in VEXiON instead? In Settings → Integrations → Storyous, click Activate in Storyous. The Storyous Marketplace opens in a new tab. Click Aktivovat there and continue in the tab that opens.
No VEXiON account yet? The Activate VEXiON cards button in the Storyous listing opens the VEXiON sign-up. You choose VEXiON PRO, monthly or annual. After payment the Storyous panel opens with the last step: click Aktivovat on VEXiON cards in the Storyous Marketplace.
On a phone? You connect Storyous on a computer. If you click Aktivovat on a phone, VEXiON cards shows Finish the Storyous connection on a computer. Open the Storyous Marketplace on a computer and click Aktivovat again.
Use this when the Storyous link is not available to you. VEXiON cards must already be activated for your merchant in the Storyous Marketplace.
1
Open the Merchant ID dialog
In the Storyous panel, click Enter Merchant ID manually.
2
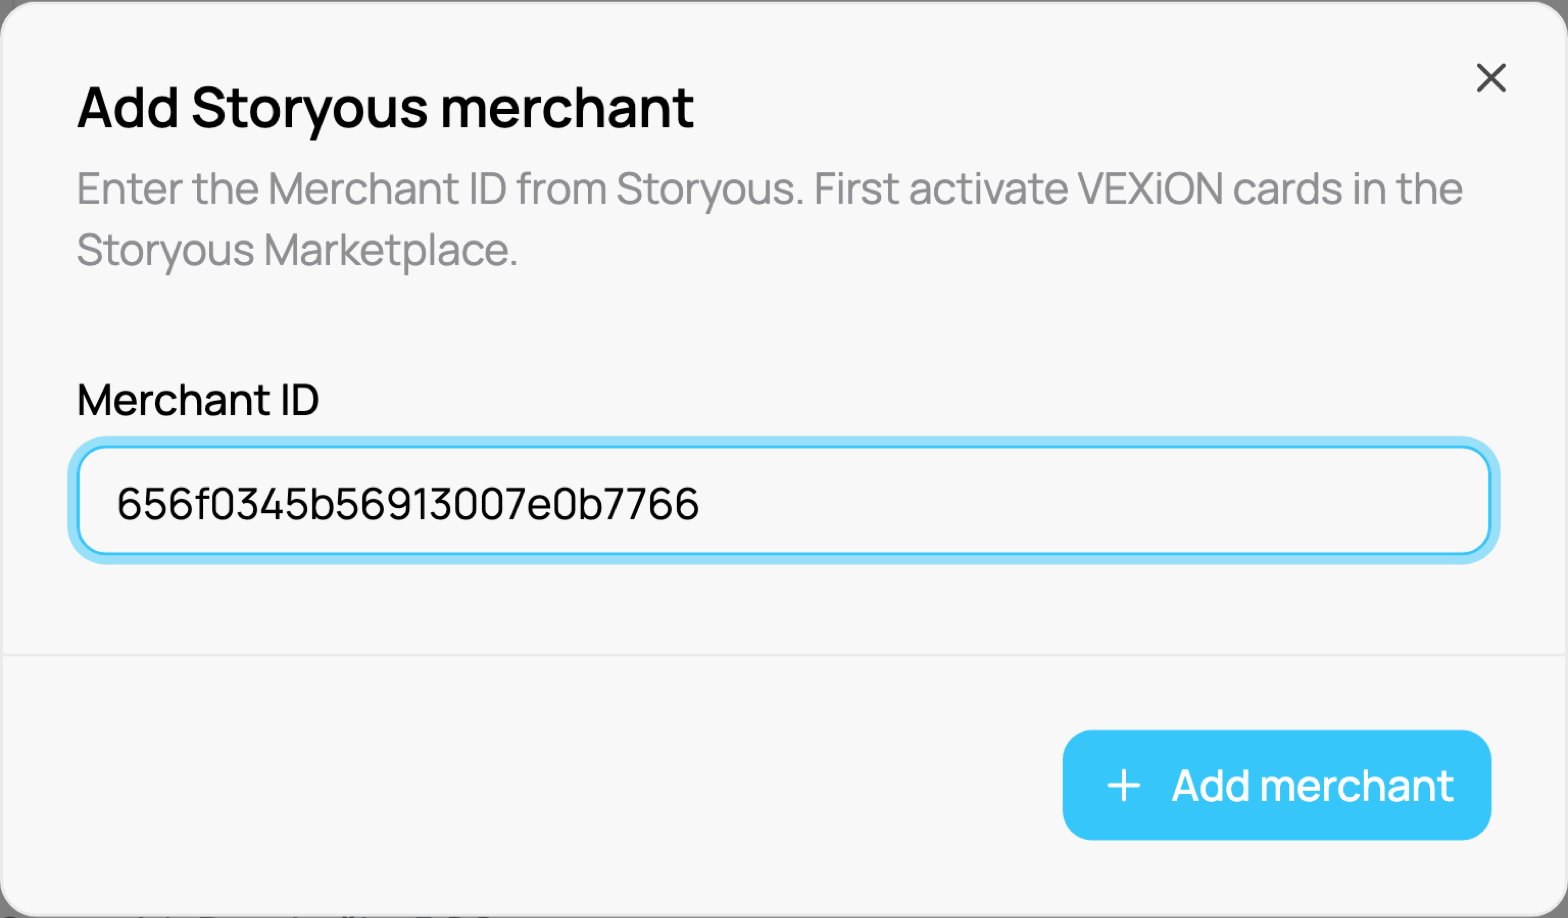
Enter your Merchant ID
Paste your 24-character Merchant ID (for example 656f0345b56913007e0b7766) and click Add merchant.
3
The merchant is verified
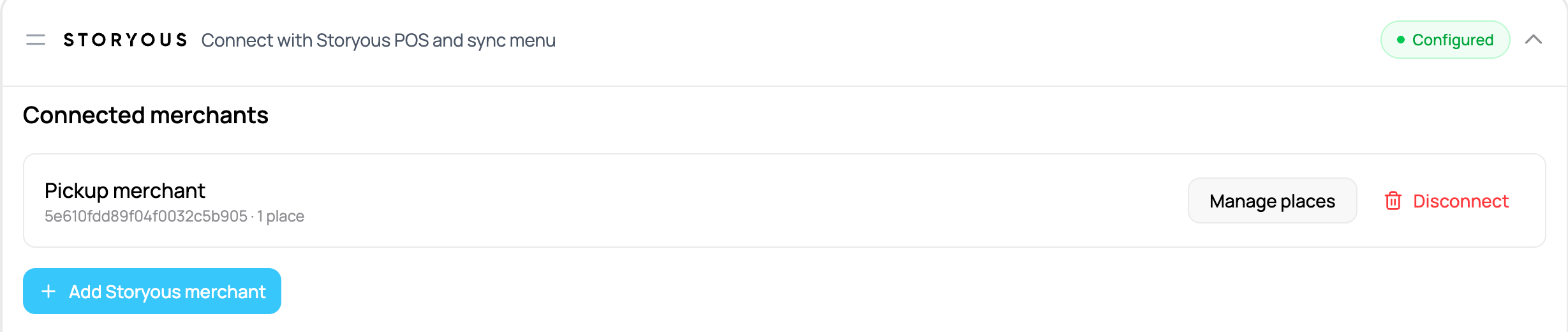
VEXiON checks the ID against Storyous. On success it appears in Connected merchants with its name, and the Select locations dialog opens.
Most businesses have one Merchant ID with several places. You do not add a separate ID per location: you add one merchant and then select its places. If you run several separate Storyous accounts (for example different companies), you can add more than one merchant to the same VEXiON account and they share one loyalty program. One Storyous merchant can belong to only one VEXiON account.
If you see “This merchant has not activated VEXiON cards in Storyous yet”, click Aktivovat in the Storyous Marketplace first. A mistyped ID shows the same message, so check the ID too. “This merchant is already connected” means the ID is already added. “This Storyous merchant is already connected to another VEXiON account” means another account holds it: write to info@vexioncards.one.
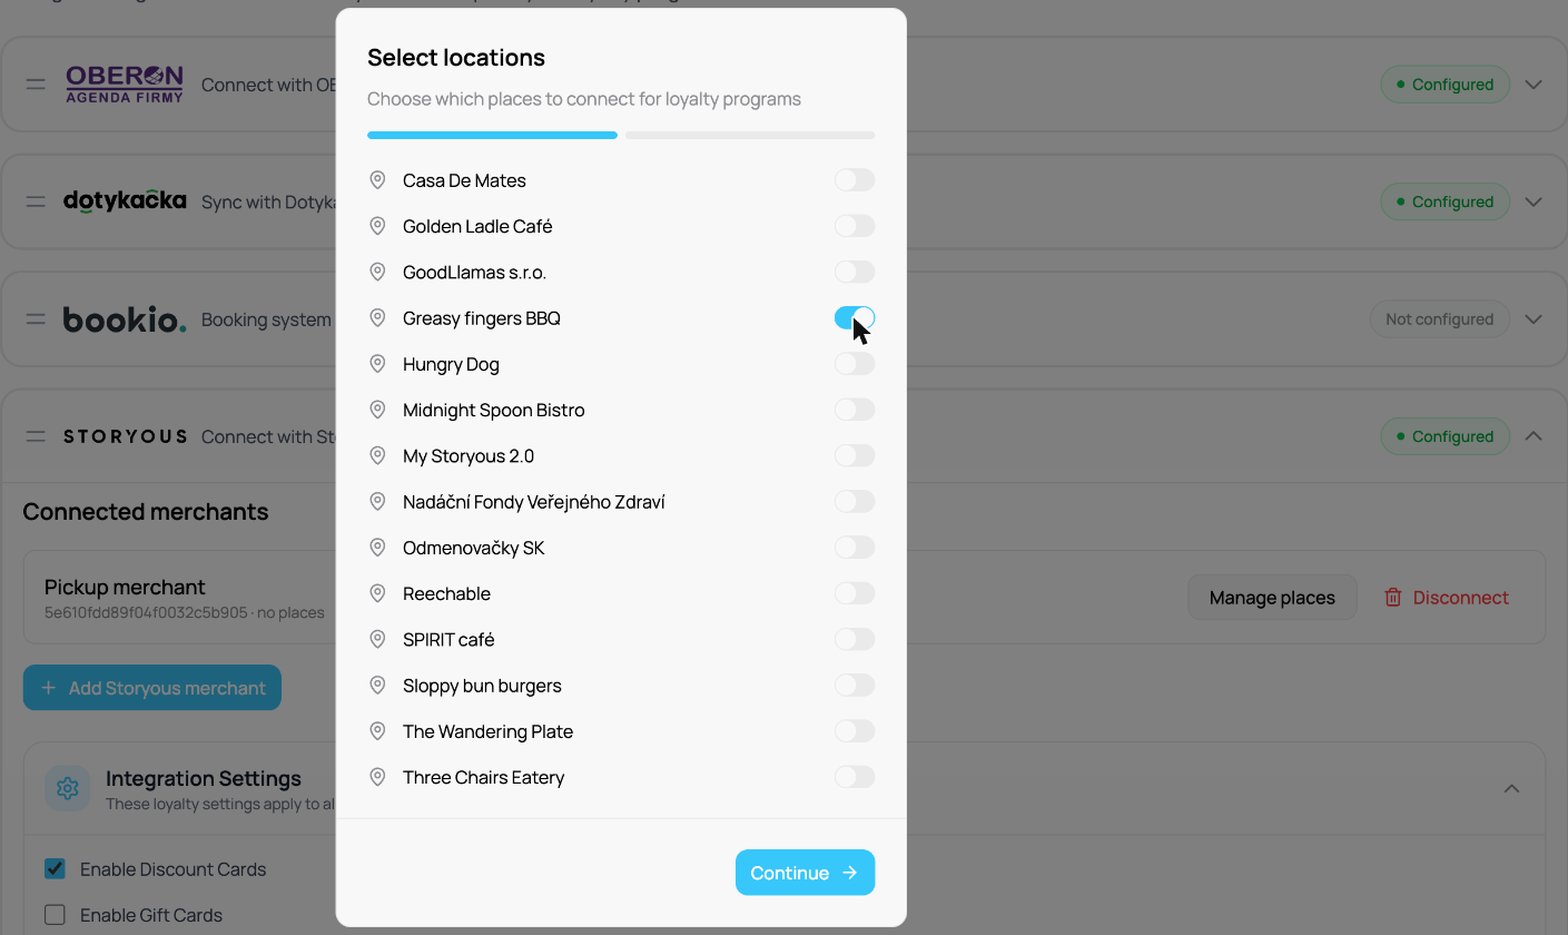
After the merchant is added, a Select locations dialog lists all the places (prevádzky) on that Storyous account. Toggle on the ones you want to connect for loyalty, then click Continue.
Greyed-out places cannot be selected. The line under the place says why: it is connected to another VEXiON account, or VEXiON is not switched on for this place in Storyous (switch it on in the Storyous Marketplace, then reopen Manage places).
A different company ID (IČO) or currency is shown as a note, never as an error. One VEXiON account can hold several companies. When the Storyous merchant uses a different currency than your VEXiON account, the till still charges in the Storyous currency.
Only active places are listed. A place that is disabled in Storyous does not appear here at all. Re-enable it in Storyous first, then reopen Manage places.
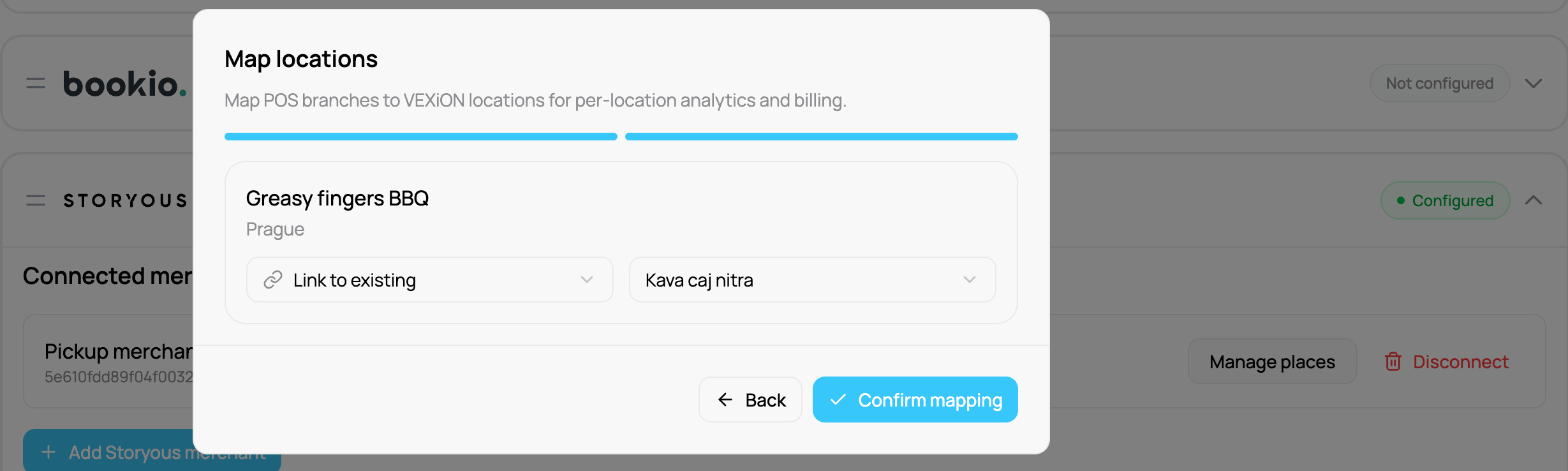
For each place you selected, a Map locations dialog links it to a VEXiON location. For each place you choose:
Link to existing, then pick the VEXiON location it belongs to, or
Create new, to make a fresh VEXiON location for it.
Click Confirm mapping.
Map every place you use. The till finds your business by the Merchant ID, so deselecting a place does not stop the till answering and does not delete anything. A mapped place makes its sales count under the right VEXiON location in reports.
Each mapped location is a billing unit on the graduated per-location pricing. Linking to an existing location does not add cost. When you choose Create new, a VEXiON PRO account sees either “Adding 1 new location will update your subscription (+X/mo)” or “Using N of M available paid slots. No additional cost.” Other accounts see only “Each mapped location counts as a billing unit.” You can deselect places in that dialog before you press Confirm mapping. Your bill follows your VEXiON locations. Deselecting a place later, or disconnecting the merchant, does not remove the VEXiON location and does not lower the bill. To stop paying for a location, remove the location itself in Settings → Locations.
The Link to existing dropdown lists only VEXiON locations that are not already mapped to another POS branch. If the location you expect is missing, it is already mapped somewhere else.
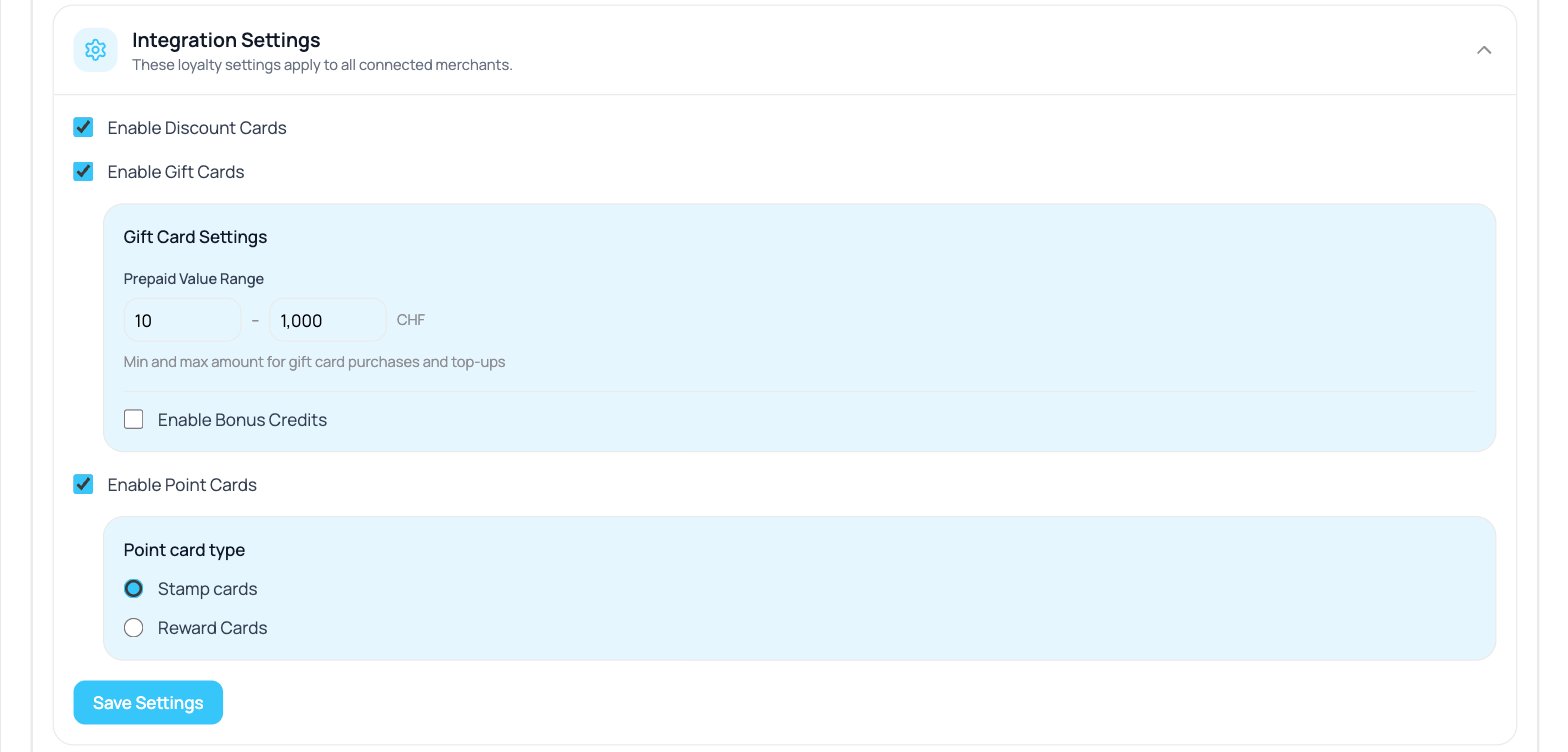
Below the merchants, Integration Settings turn features on or off. A note reminds you these settings apply to all connected merchants.
Setting
Default
What it does
Enable Discount Cards
✅ On
Automatic percentage discounts by tier
Enable Gift Cards
❌ Off
Prepaid credit for purchases
Enable Point Cards
❌ Off
Collecting stamps or points
When Enable Point Cards is on, you choose the Point card type:
Stamp cards: whole-number stamps (a “10th coffee free” style program).
Reward Cards: points, with a Redemption Mode:
Credit Cashback: set the Value of 1 Loyalty Point (for example 0.01, so 1 point = 0.01€). Points convert to a euro credit. The customer sees the credit in euros on the card. The till shows euros first and the points in brackets, because the cashier types points.
Product Rewards: points are earned and redeemed on specific products, configured in the product table. Single location only.
Click Save Settings to apply.
You can enable Discount, Gift, and Point cards together, but within Point cards you use either stamps or reward points, never both. Customers collect only one type.
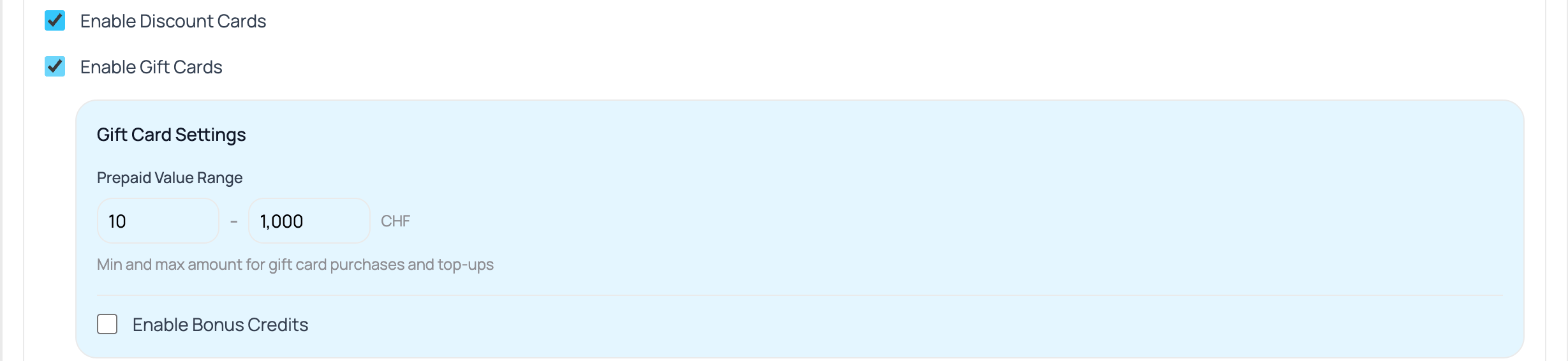
Ticking Enable Gift Cards opens a Gift Card Settings panel underneath it:
Setting
Default
What it does
Prepaid Value Range
10 to 1,000
The minimum and maximum amount for gift-card purchases and top-ups
Enable Bonus Credits
Off
Adds a percentage bonus on top of what the buyer pays
Bonus Percentage
0
The bonus, when the above is on (for example 10% on a 100 purchase gives 110 of credit)
The amounts are shown in your VEXiON account’s currency. If your Storyous merchant bills in a different currency, see the note below on currency display.
The gift card settings, revealed by enabling gift cards
If you switch Point card type from Reward Cards to Stamp cards and save, VEXiON asks you to confirm, because stamps are whole numbers:
Switching to Stamp Cards. You are switching from reward cards to stamp cards. All decimal point values will be rounded to whole numbers (e.g., 2.5 → 3, 10.75 → 11). This change affects all products in your menu.
Click Confirm and Save to go ahead, or Cancel to keep reward points.
Your earn and redeem values are not changed when you switch. They stay exactly as they were. If you are moving from reward points to stamps, set the whole numbers you want yourself, in the product table or by import. At the till, the stamps earned on a sale are rounded down to a whole number.
The confirmation shown when switching to stamp cards
Currency in the settings is your account’s, not the merchant’s. The Value of 1 Loyalty Point and the gift-card range are labelled with your VEXiON account’s currency. If your Storyous merchant bills in a different one, those two labels will not match your till. The product table is different: it shows each place’s own currency, taken from Storyous. It loads that a moment after the table appears, so prices can flash your account’s currency first, and if the lookup fails they stay on it. If a price is labelled in a currency the place does not use, reload the page. The POS always charges in the merchant’s currency, so what the customer pays is unaffected.
The last step is to pull your products from Storyous so you can set loyalty on them. For each connected place, click Sync Menus.Full instructions are in Menu and products.
To remove a merchant, click Disconnect on its card. VEXiON asks you to confirm with “Disconnect this merchant?” and spells out what happens:
Removing (merchant name) will unlink all its places from VEXiON locations and delete its synced products. This cannot be undone.
Confirming unlinks its places from your VEXiON locations and deletes that merchant’s synced product rows, including the loyalty settings you set on them. Customers and their card balances are not deleted.
Reconnecting the same merchant afterwards brings the products back from Storyous, but they come back with loyalty at the defaults, so your earn, redeem, and discount values are lost. Export the product list to Excel before disconnecting if you may reconnect later.
Disconnecting is per merchant. If you run several merchants, removing one does not affect the others.